
Start Here
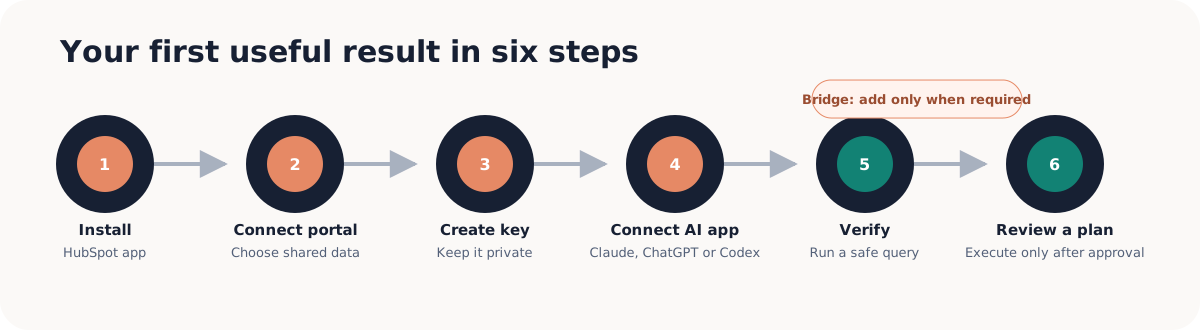
Follow this guide in order to connect HubSpot, connect your AI app, and prepare a first reviewed Write Plan. You do not need to understand MCP, SQL, or Daeda AI’s data architecture to complete these steps.
Before You Start
Section titled “Before You Start”- You need permission to install or re-authorize HubSpot apps for the portal.
- You need access to the Daeda AI settings page in HubSpot.
- Decide which HubSpot portal should receive the first test change.
- Allow time for connected portal data to build. Small portals can become ready quickly; larger portals can take longer.
If your team uses one HubSpot portal, that portal can be both the place where Daeda AI is administered and the portal where work happens. Consultants and agencies normally administer Daeda AI from one portal and connect each customer portal separately. Read How Daeda AI Portals Work if you are unsure which arrangement applies to you.
1. Install Or Open Daeda AI
Section titled “1. Install Or Open Daeda AI”Install Daeda AI from the HubSpot Marketplace, or open it from HubSpot’s connected-app settings if it is already installed. Follow Install Daeda AI In HubSpot for the complete installation walkthrough.
You are ready for the next step when the Daeda AI settings page shows Write Plans, Connect Client Portal, License Keys, and Billing.
2. Connect A Portal
Section titled “2. Connect A Portal”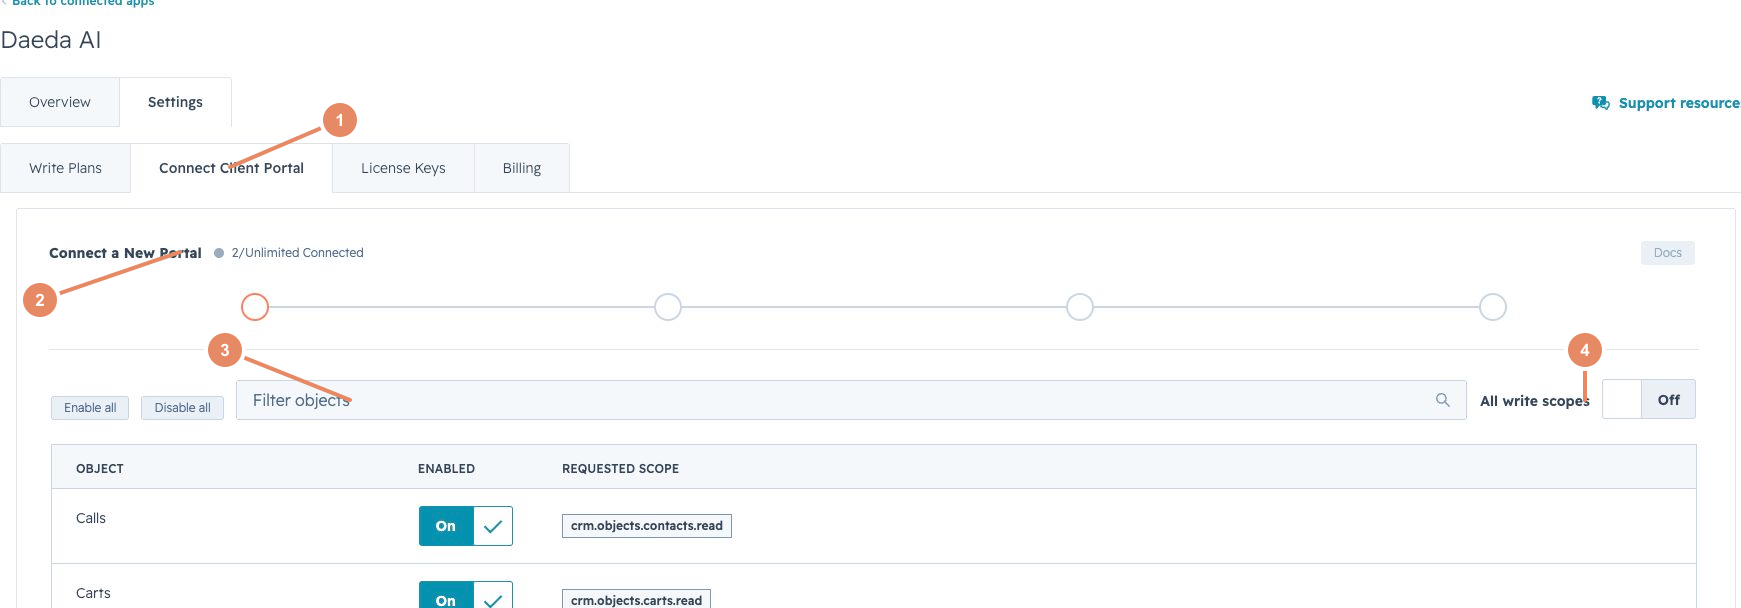
Choose only the HubSpot data categories Daeda AI needs for the work you plan to do.
Open Connect Client Portal, then choose Connect a New Portal. Select the HubSpot data categories Daeda AI needs for the questions and changes you plan to make. Start with the smallest useful set; you can add more access later.
Continue through Data Rules, generate the installation link, and open that link while signed in to the HubSpot portal where work should happen. Approve the connection, then return to Daeda AI.
You are ready for the next step when the portal appears in Connect Client Portal with its configuration saved. It may show BUILDING while Daeda AI prepares the selected data.
For every screen in this process, follow Connect A New Portal. Administrators who need exact HubSpot access names can use the Permissions And Scopes reference.
3. Create A License Key
Section titled “3. Create A License Key”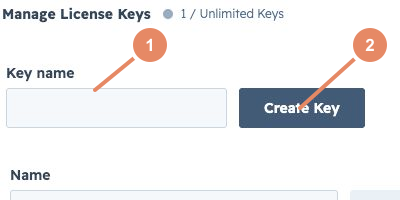
Give the connection a recognizable name, then create the key used by your AI app.
Open License Keys, enter a name that identifies the AI app or workspace, and choose Create Key. Copy the new key when it is shown.
Treat the key like a password. Do not paste it into shared documents, screenshots, support messages, or project files. Rotate it when access ownership changes.
4. Connect Your AI App
Section titled “4. Connect Your AI App”Open the Integrations guide, choose the AI app you use, and follow only that app’s instructions. Claude and ChatGPT use a sign-in flow. Codex, Cursor, VS Code, and Windsurf also provide advanced configuration options.
You are ready for the next step when the AI app reports that Daeda AI is connected.
5. Verify The Connection
Section titled “5. Verify The Connection”Start a new conversation and ask:
Using Daeda AI, list the HubSpot portals I can access. For each portal, tell me whether its data is ready. Do not make any changes.
A successful answer names the connected portal and explains whether its data is ready, building, partial, or unavailable. If no portal appears, check the license key and portal connection before continuing.
6. Run A First Query
Section titled “6. Run A First Query”Ask a narrow question with an answer you can verify in HubSpot. For example:
Using Daeda AI, show me the five most recently created deals in [portal name], including deal name, stage, amount, owner, and create date. Do not make any changes.
Check that the answer names the intended portal and reports the fields and date range it used. See Querying HubSpot for more examples.
7. Prepare A First Write Plan
Section titled “7. Prepare A First Write Plan”Choose a small, easy-to-remove test change. For example:
In [portal name], prepare a Write Plan to create a static list named Daeda AI Setup Test. Do not execute it.
Open Write Plans in HubSpot. You are ready for review when a plan with the DRAFT state appears for the correct portal.
8. Review Before Execution
Section titled “8. Review Before Execution”Open the draft and compare the portal, title, description, operations, warnings, permissions, and affected assets with your request. Choose Reject if anything is wrong. Choose Execute, then Confirm Execute, only when every operation is intentional.
After execution, review the result of every operation and verify the created asset in HubSpot. Continue with Review And Execute Write Plans for the full checklist.
Add The Bridge Only When Needed
Section titled “Add The Bridge Only When Needed”The Daeda Bridge browser extension unlocks HubSpot capabilities that are not available through the normal HubSpot connection. You do not need it for this first-run journey. Install it later when a requested action is marked as requiring the Bridge.
You have completed setup when your AI app can identify the correct portal, answer a verifiable question, and create a draft Write Plan that you can review in HubSpot.